Batik on Silk
Batik began as a textile art in the Indian sub-continent however it reached its pinnacle in Indonesia. The art form gained popularity in south east Asia and today some of the best batik work can be traced to this part of the world. The challenge with this art form comes from the usage of steam & wash which affect the quality of the end product. Batik has traditionally been practised on cotton and certain types of silks that absorb colours well. With pure mulberry silk, batik can be a hit or a miss and relies heavily on the artist’s capability to execute it well. For instance, if the paint is too thin, it is likely to bleed out of the garment and not get sufficiently absorbed. For fine batik, which is equivalent to art forms, the wax is applied on both sides of the fabric using canting and the paint is then applied slowly with the small brush to ensure the work is done well. Colours are filled using a layered technique going from light to dark. To complicate matters further, wet colours cant be mixed since the darker shade may overpower and bleed into the light shades. So, every layer is completely dried before moving one. Once a layer of paint is completed, another layer of wax is applied to ensure they painted colour is secure. So, applying the hot wax calls for patience and care to ensure the end product is stunning. In the case of silks, guta or cold wax is used which can be removed without wash but this technique is not advisable since improper wash by the customer may ruin the entire art work at a later stage. Hot wax ensures that the colours are properly fixed and the artist ensures the garment is properly washed before it reaches the end user.

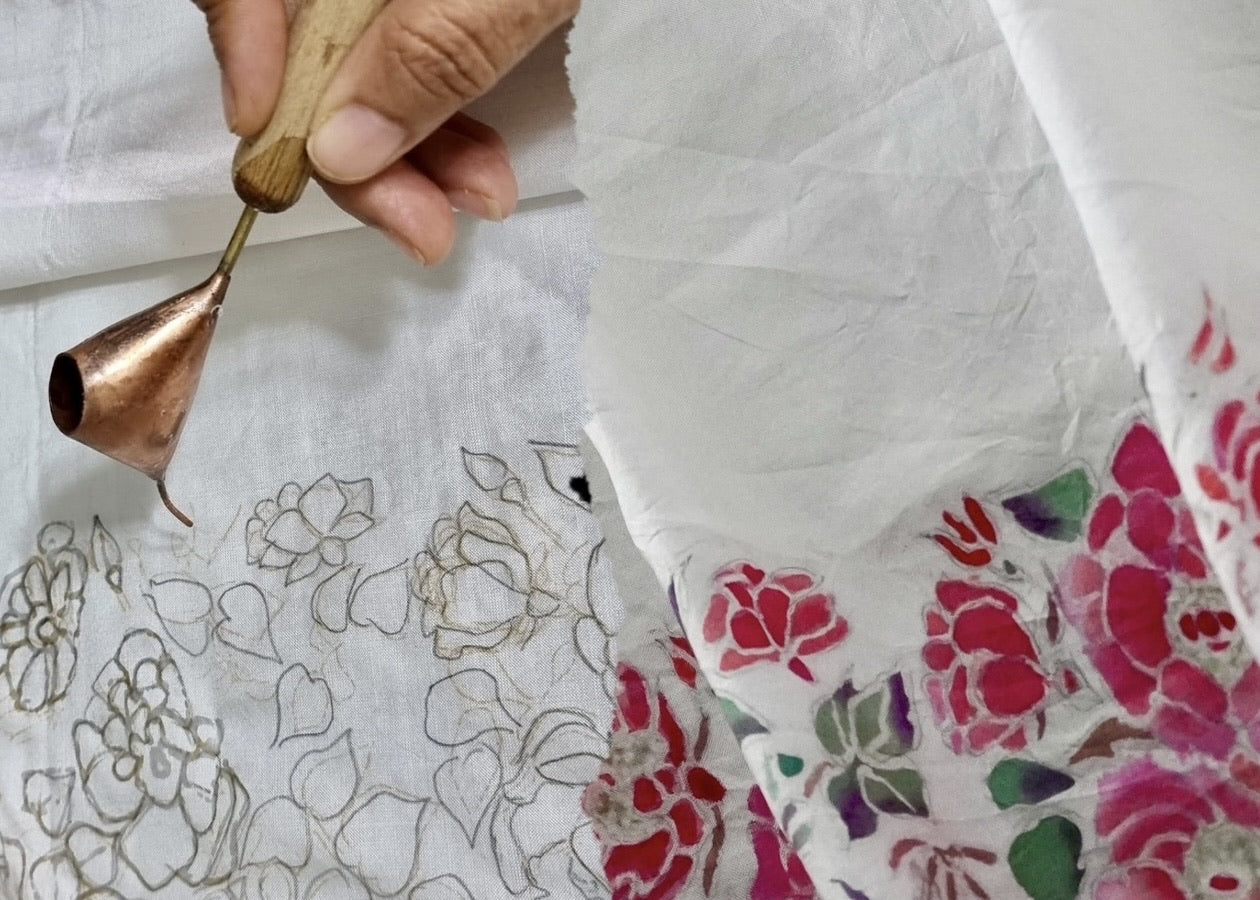
The first step is drawing the design on to the fabric and then tracing the outline with canting device where hot wax is applied as an outline. There after the painting layers start with the lightest shade to the darkest. At every step the paint layer is allowed to dry, then a fresh layer of wax is applied to cover the dried layer. This way, the artist may employ as many at 10 to 20 layers on a single motif to achieve the desired end result. The last stage is the background technique which is usually the most challenging part. Since a small error can completely ruin the layers of batik painting done previously. Securing the painted area and creating the background is extremely complex on pure silk. Since the batik paint is very thin it spreads and runs a chance of enveloping the entire fabric in a few seconds ruining many hours of patient work. When it comes to creating the background, a number of techniques can be used from marbling, crackling, tie & dye and so on. Lines and dotted textures can be achieved. The crackling technique is the most popular one in the market where a layer of wax is applied on the fabric and cracked once dry. The fabric when coloured now allows the dye to penetrate via the cracks creating a beautiful textured effect.
Once the painting processes are complete, the artist removes the wax completely an begins fixing the colours. Once the colours are fixed, the wax is removed and once again the colour fixing is done. Then the garment is allowed to sit for a few hours with the fixer. The popular colour fixer is sodium silicate. The final stage is washing where the batik garment is fully immersed in a tub and flowing water is allowed to wash the excess paint off the garment. This step is extremely crucial. Commercial establishments use industrial tubs or find a natural water source. This step lasts close to an hour to ensure the colour fixer, wax and paint is fully removed and what remains is the fine batik painting. After this the fabric is streamed or boiled. In this step, the entire fabric is dipped in hot boiling water with soda ash to ensure any remanent wax or impurities leave the fabric. In big workshops a commercial steamer may be used to replace the boiling water. Finally, the fabric is washed in cold water and dried. After this step the fabric is safe to be worn & enjoyed.

Batik is an art form that teaches you a lot of patience. For long after the painting is done, the colour fixing and washing takes up time. It has to be approached with patience at every stage. Batik is done commercially today and most often, a single colour batik painting is done and the entire fabric is commercially dyed by dipping the fabric is a dye. This is very different from fine batik where the artist approaches the project like a canvas and develops the layers one by one. Further, many commercially done batiks do not fix the colours sufficiently hence while the fabric may arrive bright, it runs colour with every wash and may fade with time. A fine artist who works with batik will ensure that their work lasts but following all the steps ensuring the colours are fixed sufficiently. This is something a customer may not realise at the time of buying and may uncover it as they use.
Redish Pink Dupatta:

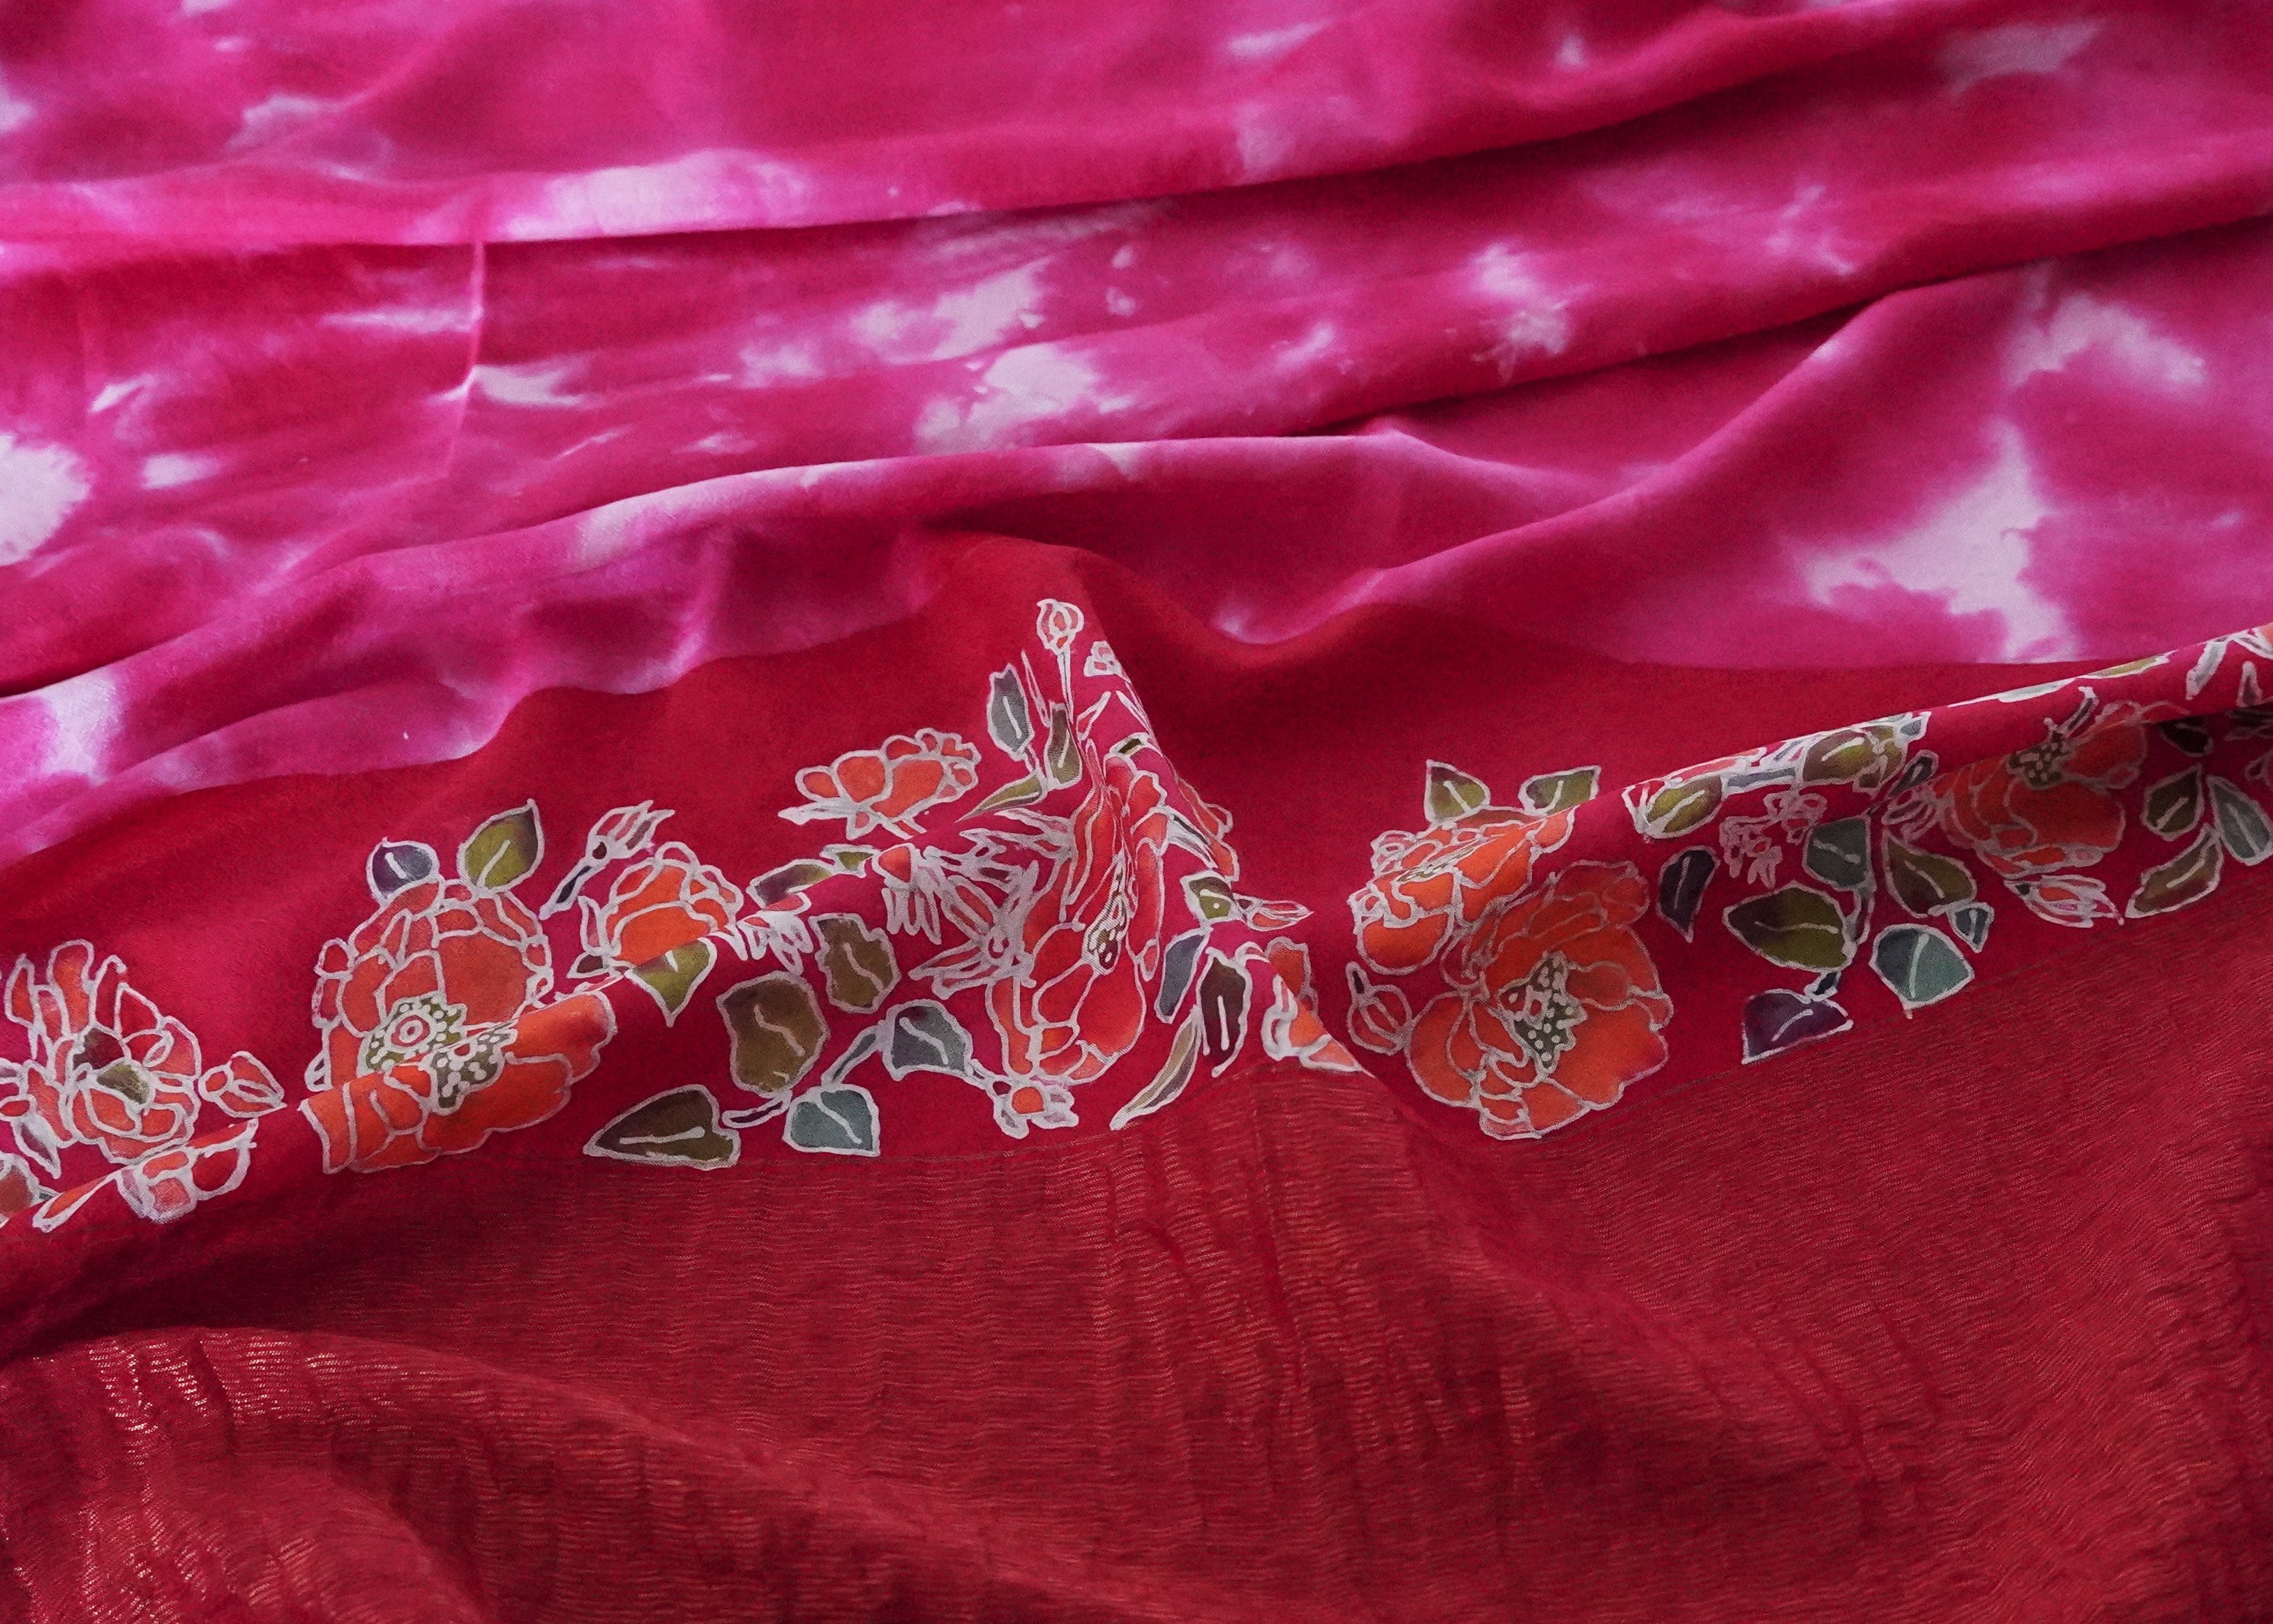
A fine silk dupatta was taken as a test to try the background and floral motifs. Following are the steps involved.
- Step 1: Tracing the design
- Step 2: Use the canting to draw a layer over the design to secure the outline
- Step 3: To begin filling colours. The first shade is a colour wash which is the thinnest layer. This layer is allowed to dry and another layer is filled in. This drying and painting is done 4-5 times to achieve the shading on the colours. Once the petals are coloured. The leaves are coloured.
- Step 4: Covering this painted area with a colour fixer.
- Step 5: Washing the colour fixer.
- Step 6: The coloured portion is now completely encased in hot wax to prevent any further colours from penetrating the area.
- Step 7: Creating the background by first painting the lightest shade of red on to the background area. In this case some places where further tied to give a layer of tie-dye layering and this area was painted. The textures effect was created by a combination of painting, stippling and tie-dye resist.
- Step 8: Now a colour fixer is again used to fix the colour on the dupatta and allowing it to rest for 6-7 hours.
- Step 9: Once the colour is fixed, the color is removed from one corner to check if the colour has been fixed sufficiently. If not, step 8 may be repeated to ensure colour fixing is achieved better.
- Step 10: If the test is successful the artist begins washing the fabric under a fast-moving water to ensure the first wash is completed successfully. This wash is very important.
- Step 11: After this the fabric is dipped in hot boiling water with soda ash.
- Step 12: After this step, the fabric may be washed with a gentle detergent and finally given a cold-water wash to complete the process
- Approximate Time Estimate:
- Designing: 15 hours
- Applying wax with Canting and painting: 35-40 hours
- Colour Fixing & Washing: 10-12 hours
- Total time needed is: 7-8 Days
White Dupatta:

The second dupatta features a beautiful floral motif all along the body. The white silk becomes the natural backdrop for the dupatta.
- Step 1: Washing the dupatta completely to ensure the impurities are completely removed and dried.
- Step 2: Tracing the design into the fabric
- Step 3: Use the canting to draw a layer over the design to secure the outline
- Step 4: To begin filling colours. The first shade is a colour wash which is the thinnest layer. This layer is allowed to dry and another layer is filled in. This drying and painting is done 4-5 times to achieve the shading on the colours. Once the petals are coloured. The leaves are coloured.
- Step 5: Covering this painted area with a colour fixer and allowed to sit for a few hours.
- Step 6: The dupatta is washed under running water to completely for 30mins
- Step 7: After this the fabric is dipped in hot boiling water with soda ash.
- Step 8: After this step, the fabric may be washed with a gentle detergent and finally given a cold-water wash to complete the process
- Since this does not involve background painting this is considered relatively easy to achieve.
- Approximate Time Estimate:
- Designing: 15 hours
- Applying wax with Canting and painting: 15 hours
- Colour Fixing & Washing: 7-10 hours
- Total time needed is: 6 Days
Some things to note:
- The end result entirely depends on the colours used and how it matches the silk. Since silk is a challenging medium to work with, colours play a very important role here.
- Each colour may behave differently and has to be tested before using. Every new colour we introduce has to be tested on a small fabric area before larger application
- The wax applied using canting has to be done on both sides of the fabric else the liquid dye will run out or mix with other layers. This is the most challenging part since wax begins to slide on smooth silk and hence has to be done with extreme caution. If done improperly, the wax may slide and disrupt the design. Not applying sufficient wax will mean the shading we wish to achieve may not be possible. Thus, this step is very crucial and calls for a lot of skill. Commercially available batikx evade this by choosing artificial silk or cotton and using a wider canting applicator.
- Every design has to be fixed with a layer of colour fixer and cover with wax before the next layer is fixed.
- Washing is done under fast running water else we run the risk of staining the whole fabric.
- The colour fixer has to be applied as precisely as the paint itself. It is extremely alkaline and has to be handled with care.
- Handling hot wax and creating the layers calls for expertise that an artist develops with time. All processes have to be done in a well-ventilated area and preferably in day time.
- This is one art form where a steady hand & painting skills are combined with technical expertise, handling fixers and washing which are extremely time dependant. The whole process calls for extreme patience to ensure the end result is in line with what we want.

Batik as a textile art is practiced extensively in India. From the “Sungudi” variants to the beautiful batiks of West Bengal, one can find many variants. However, most of these batiks are commercial batiks where the wax resists dip-dye technique. As the craft travelled to parts of south east Asia, particularly Java, the craft became finer. The designs got more precise and intricate. What we present in this series is Fine Batik where dyes are hand-painted with a brush. This technique is used for batik panels that are framed. The beauty of this technique lies in the fact that every single colour is the result of several layers of brush strokes by an artist of calibre.
At Parvai we marry the best of art & design to stunningly produced world-class fabrics to produce something truly unique. Our unique prototyping process ensures we get through several experiments before producing something our patrons will enjoy & cherish.

About the artist:
Deepa Rajendra is an artist from Udupi, Karnataka. She currently lives and works Kuala Lumpur, Malaysia. She holds a Masters in History & Archeology (Temple Art, Architecture & Sculpture). She is an accomplished Bharatanatyam Dancer, Choreographer, Yakshagana Exponent & Artist. She dabbles in multiple mediums from set designs to canvas painting. Her stay in Malaysia has influenced her art journey & she specialises in fine Batik, tanjore art, mural art, Gond, Madhubani & some other traditional art forms. She teaches & practices art in Kuala Lumpur and is regularly featured in many art shows at Malaysia & India.


Leave a comment
This site is protected by hCaptcha and the hCaptcha Privacy Policy and Terms of Service apply.